Day 1: Docker and Containers for the CKA Certification
Docker serves as the foundation upon which Kubernetes orchestrates containerized applications at scale. Mastering Docker is therefore an essential first step.
Day 1
Welcome to this series dedicated to preparing for the Certified Kubernetes Administrator (CKA) certification. This step-by-step training is designed to guide you in learning and mastering the foundational concepts and practical skills essential for earning this globally recognized certification. Throughout this series, you will explore key topics such as:
- Containerization with Docker and its role in the Kubernetes ecosystem.
- The basics of Kubernetes, including managing pods, services, and deployments.
- Kubernetes cluster administration, with a focus on high availability and security.
- Solving common challenges faced by Kubernetes administrators in production environments.
Each tutorial is structured to provide a clear progression, blending theory and practice to strengthen your technical skills. Whether you are a beginner or already experienced, this series will equip you with the tools needed to excel in your CKA exam and your professional projects.
Take the time to experiment with each step, and feel free to revisit key concepts if needed. Best of luck with your preparation and success on your journey toward the CKA certification!
1. Introduction to Docker
1.1. What is Docker?
Docker is a powerful open-source platform designed to simplify the development, deployment, and execution of applications through containerization. Containers provide lightweight, portable, and isolated environments that package an application along with its dependencies. This ensures consistent behavior across various computing environments. Docker has become indispensable for modern software systems, offering unmatched speed, efficiency, and scalability.
The simplicity and power of Docker have made it a revolutionary tool for development teams. It enables consistent workflows, whether you are coding on your laptop, testing in a CI/CD pipeline, or deploying to production clusters.
1.2. Understanding Containers vs. Virtual Machines

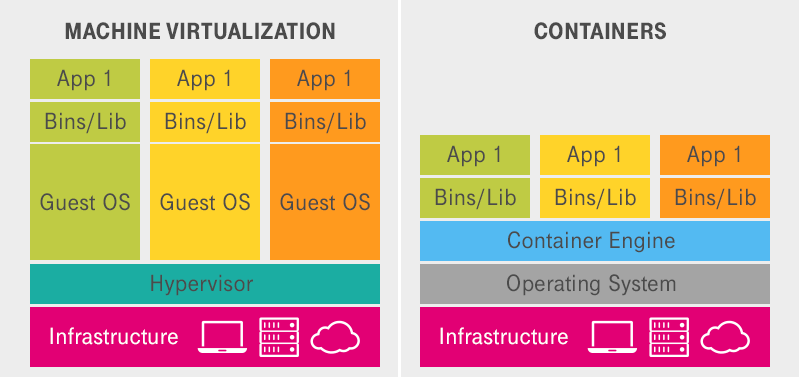
Both containers and virtual machines (VMs) provide isolated application environments, but their underlying mechanisms differ fundamentally:
- Virtual Machines (VMs):
- Operate via a hypervisor layer, such as VMware or VirtualBox, running a complete guest operating system (OS).
- Consume significant resources, as each VM includes its own OS kernel.
- Have relatively long startup times due to the full OS initialization process.
- Containers:
- Share the host OS kernel, eliminating the overhead of an additional guest OS.
- Lightweight, containing only the application and its dependencies.
- Feature fast startup times and minimal resource consumption, making them more efficient.
1.3. Containers vs. Virtual Machines: An Analogy
To clarify the difference, consider the analogy of residential buildings:
Virtual Machines: These are like standalone houses. Each house has its own foundation, walls, plumbing, and electrical system, much like a complete operating system. While isolated, they require significant resources to construct and maintain.
Containers: These are akin to apartments in a shared building. Apartments share a common infrastructure (foundation, walls, utilities), similar to the host OS kernel. Each apartment is self-contained but lighter and faster to construct than a standalone house.
1.4. Challenges of Non-Containerized Applications
Before the advent of containerization, applications faced several inherent challenges:
Dependency Conflicts: Different applications often required incompatible versions of the same libraries or runtime environments, causing conflicts.
Environmental Inconsistencies: Applications frequently worked on a developer’s local machine but failed in production due to environmental differences.
Resource Inefficiency: Running multiple applications on the same machine required resource-intensive virtual machines or complex configurations.
Scalability Limitations: Scaling or updating applications was labor-intensive, error-prone, and time-consuming.
1.5. How Docker Addresses These Challenges
Docker effectively solves these systemic challenges:
Isolation: Containers encapsulate all necessary dependencies, eliminating conflicts between applications.
Portability: Containers ensure consistent application behavior across different environments—from development to testing to production.
Efficiency: Sharing the host OS kernel reduces resource consumption and accelerates startup times.
Scalability: Docker simplifies horizontal scaling by enabling rapid deployment of multiple containers derived from the same image.
Now, let’s move from theory to practice and explore how to use Docker effectively.
1.6. A Simple Docker Workflow
To understand Docker’s utility, let’s explore its basic workflow:
Write a Dockerfile: Create a
Dockerfileto define your container’s blueprint, specifying the base image, application code, and dependencies.Build an Image: Use
docker buildto compile an image from the Dockerfile.Run a Container: Use
docker runto instantiate and run a container from the image, creating an isolated runtime environment.Push to a Registry: Save and share the image by pushing it to a container registry (e.g., Docker Hub) with
docker push.Pull and Deploy: Download and deploy the image on another system using
docker pull, ensuring consistent application behavior.
1.7. Docker Architecture

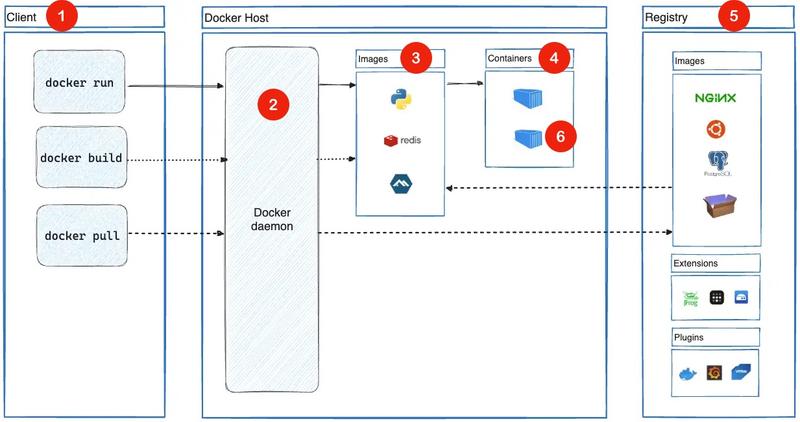
The Docker architecture consists of several key components:
Docker Client: The user interface to interact with Docker. Commands like
docker buildanddocker runare sent to the Docker Daemon.Docker Daemon (dockerd): The core service that manages images, containers, and their lifecycle. It processes client requests and coordinates operations.
Images: Immutable templates used to create containers. They encapsulate the application’s environment and dependencies.
Containers: Lightweight instances of images that provide runtime environments for running applications.
Docker Registry: A centralized repository to store and distribute Docker images (e.g., Docker Hub or private registries).
Container Runtime: The underlying engine responsible for running containers. Docker’s runtime, such as
containerd, ensures efficient container execution.
This guide provides a foundational understanding of Docker’s capabilities and its transformative role in modern software development. As you delve deeper, experiment with Docker’s features to master containerization and simplify application deployment.
2. Installing Docker
Before containerizing a project, ensure Docker is installed on your system. Here are the two main options:
2.1. Using Docker Desktop (Comprehensive but Heavy Solution)
- Advantages: Easy to install, with a graphical user interface and integrated tools.
- Disadvantages: Can be resource-heavy and installs components often unnecessary for CKA preparation. Licensing may also pose challenges in enterprise environments.
- Steps:
- Download Docker Desktop from docker.com.
- Install and launch Docker Desktop.
2.2. Installing Docker Components Individually (Recommended)
- Advantages: Lightweight installation, tailored for CKA preparation.
- Disadvantages: Requires a few extra steps on macOS and Windows.
2.2.1. For Windows with WSL2
- Step 1 - Open PowerShell and install WSL2 by following the official Microsoft documentation.
wsl --install- Step 2 - Open the Ubuntu Linux distribution that has been installed and follow the Linux installation steps below.
2.2.2. For Linux
- Step 1 - Update your repositories:
sudo apt update- Step 2 - Install Docker:
sudo apt install docker.io- Step 3 - Enable and start Docker:
sudo systemctl enable docker
sudo systemctl start docker- Step 4 - Add your user to the Docker group (to avoid using
sudo):
sudo usermod -aG docker $USERRestart your terminal to apply the changes.
2.2.3. For macOS with Docker CLI and Colima
- Step 1 - Install the Docker client using Homebrew:
brew install docker- Step 2 - Install Colima using Homebrew:
brew install colimaWhy Colima?
- macOS requires Colima to run Docker, as its Darwin (BSD-based) kernel does not natively support Linux containerization features like
namespacesandcgroups. - Colima is a lightweight tool based on Lima that creates an optimized Linux virtual machine for running the Docker daemon, providing a compatible environment.
- Step 3 - Start Colima to initialize the Docker daemon:
colima start -f2.3. Testing the Installation
- Run the following Docker command to test your installation:
docker run hello-worldYou should see a message indicating that everything is working, as shown below:
Hello from Docker!
This message shows that your installation appears to be working correctly.

To generate this message, Docker took the following steps:
 1. The Docker client contacted the Docker daemon.
 2. The Docker daemon pulled the "hello-world" image from the Docker Hub.
    (arm64v8)
 3. The Docker daemon created a new container from that image which runs the
    executable that produces the output you are currently reading.
 4. The Docker daemon streamed that output to the Docker client, which sent it
    to your terminal.

To try something more ambitious, you can run an Ubuntu container with:
 $ docker run -it ubuntu bash

Share images, automate workflows, and more with a free Docker ID:
 https://hub.docker.com/

For more examples and ideas, visit:
https://docs.docker.com/get-started/By following these steps, you will have a fully configured and operational Docker environment, ready for local testing, development, or orchestration preparation with Kubernetes.
Alternatives to Docker
While Docker remains the go-to tool for containerization, many alternatives are now available. Among the main solutions that can replace either the Docker daemon or client, notable options include:
- Podman: A daemonless alternative with a Docker-compatible interface.
- Containerd: A lightweight container runtime used by Docker itself, which can also be used directly.
- CRI-O: A container runtime optimized for Kubernetes, adhering to the CRI interface.
However, for CKA certification preparation, it is recommended to use Docker to ensure familiarity with the fundamentals and tools frequently mentioned in the documentation.
3. Using Docker: Step-by-Step Tutorial
This tutorial will guide you through the process of containerizing a project with Docker. By the end of this guide, you will know how to create a Dockerfile, build and push a Docker image, and work with containers.
3.1. The Dockerfile (Basic Approach)
Let’s start with a simple approach. This will help us understand the limitations, which we can compare to a more optimized approach later.
- Step 1 - Create a directory for your project:
mkdir docker-c-app
cd docker-c-app- Step 2 - Create a
main.cfile containing:
#include <stdio.h>

int main() {
    printf("Welcome to your Docker application!\n");
    return 0;
}- Step 3 - Create an initial
Dockerfile:
# Use an image with GCC to compile and run the application
FROM gcc:latest

# Set the working directory
WORKDIR /app

# Copy the source file
COPY main.c .

# Compile the application
RUN gcc -o app main.c

# Define the default command
CMD ["./app"]
Dockerfile Syntax
For a deeper understanding of Dockerfile syntax and concepts, refer to the official documentation: Dockerfile Reference.
- Step 4 - Build the Docker image:
docker build -t c-app-basic:1.0.0 .Command Explanation:
docker build: This command creates a Docker image based on the instructions defined in theDockerfilelocated in the current directory.-t c-app-basic: The-toption assigns a name (c-app-basic) and a tag (1.0.0) to the image. If no explicit tag is specified, Docker defaults tolatest..: This period indicates that the build context is the current directory, where Docker looks for theDockerfileand other files needed to build the image.
Once this command is executed, Docker reads the instructions in the Dockerfile, builds the image, and saves it locally on your system.
- Step 5 - Verify that the image was created:
docker imagesThis command displays the list of Docker images available on your local system:
% docker images
REPOSITORY    TAG       IMAGE ID       CREATED         SIZE
c-app-basic   1.0.0     70543dee1b46   4 minutes ago   1.39GB
gcc           latest    d18c3b309576   5 months ago    1.39GB
hello-world latest ee301c921b8a 20 months ago 9.14kBLook for the name c-app-basic in the list to confirm that the image was successfully created.
- Step 6 - Run the container:
docker run --rm c-app-basic:1.0.0Command Explanation:
docker run: Starts a new container from the specified image, in this case,c-app-basic:1.0.0.--rm: Indicates that the container will be automatically removed after execution. This helps keep your environment clean and prevents unused containers from accumulating.c-app-basic:1.0.0: The name and tag of the image from which the container is created.
When you execute this command, Docker creates and starts a container based on the c-app-basic image with the 1.0.0 tag. Once the program inside the container completes, you will see the following message in your terminal:
Welcome to your Docker application!After execution, the container will be automatically deleted due to the --rm option.
Docker CLI Command Reference
To explore and master essential Docker CLI commands, check out the official cheat sheet: Docker CLI Cheat Sheet.
3.2. Issues with the Basic Approach
The basic approach, while functional, has several major drawbacks:
Excessive Image Size: The final image includes all tools required for compilation, such as
gcc, along with other unnecessary libraries and dependencies. This significantly increases the image size, making it heavier to transfer and deploy.Increased Attack Surface: Compilation tools, while useful during the build process, are unnecessary in the final image. Their presence expands the potential attack surface, exposing the image to unnecessary vulnerabilities in a production environment.
Not Optimized for Production: Best practices in production recommend including only the files necessary to run the application. In this approach, temporary build files and compilation tools add unnecessary complexity.
To check the size of the image generated with this basic approach, use the following command:
docker images | grep c-app-basicThe large size of this image (1.39GB) highlights the importance of optimizing the build process using techniques such as multi-stage builds, which will be explored in the next section.
3.3. Multi-Stage Builds with Docker
Multi-stage builds are a technique that allows for the creation of optimized Docker images by separating the application build process from the final image creation. Each stage uses a specific image and contributes incrementally to the application build, but only the necessary components are included in the final image.
3.3.1. Advantages of Multi-Stage Builds
- Reduced Image Size: Compilation tools and other temporary files remain in intermediate stages and are not included in the final image.
- Improved Security: Excluding unnecessary tools like
gccor build libraries reduces the potential attack surface. - Production Optimization: The final image is minimal, containing only what is necessary to run the application.
3.3.2. How Multi-Stage Builds Work
The Dockerfile is structured into multiple stages. One stage can rely on another using the COPY --from=<stage_name> directive. For example:
- An initial stage, referred to as the build stage, includes all the tools needed to compile or assemble the project.
- A subsequent stage, called the final stage, retrieves only the files necessary to run the application and uses a lightweight base image, such as
alpineorchainguard, to minimize the final image size.
3.3.3. Practical Implementation
To address the issues mentioned with the basic approach, let’s use a multi-stage build for our application:
- Step 1 - Modify the
Dockerfileto include multiple stages:
# Build Stage
FROM gcc:latest as builder

# Set the working directory
WORKDIR /app

# Copy the source file
COPY main.c .

# Compile the application
RUN gcc -o app main.c

# Final Stage
FROM chainguard/glibc-dynamic

# Set the working directory
WORKDIR /app

# Copy the executable from the build stage
COPY --from=builder /app/app .

# Define the default command
CMD ["./app"]- Step 2 - Build the multi-stage image:
docker build -t c-app-optimized:1.0.0 .- Step 3 - Run the container:
docker run --rm c-app-optimized:1.0.0You will see the same output in the terminal: Welcome to your Docker application!
- Step 4 - Compare the Image Sizes:
docker images | grep c-appIn my case, the output is:
% docker images | grep c-app
c-app-optimized            1.0.0     cd510de25230   17 minutes ago      9.56MB
c-app-basic 1.0.0 70543dee1b46 About an hour ago 1.39GB- You’ll notice that the optimized image is significantly smaller (99% smaller for this simple application) due to the use of a lightweight image (
chainguard/glibc-dynamic) and the elimination of unnecessary compilation tools.
3.4. Summary of Multi-Stage Build Advantages
- Reduced Image Size: The optimized image is much smaller, making it faster to deploy.
- Improved Security: Compilation tools and unnecessary files are excluded from the final image.
- Modern Practices: Multi-stage builds represent a better approach for production environments.
By comparing the two approaches, you can see how a multi-stage build simplifies container management while reducing risks and resource usage.
4. Conclusion
Standalone containers, while useful for simple applications, pose challenges in terms of scalability, resource management, and orchestration when deployed in more complex systems. Managing networking, load balancing, and ensuring high availability manually becomes increasingly difficult as application complexity grows.
Kubernetes addresses these challenges by automating the deployment, scaling, and management of containerized applications. It offers features like self-healing, load balancing, resource optimization, and declarative configuration, making it ideal for managing production environments.
4.1. When to Use Kubernetes
- Applications with a microservices architecture requiring orchestration.
- Environments demanding high scalability and fault tolerance.
- CI/CD pipelines for consistent testing and deployments.
- Multi-cloud or hybrid deployments to distribute workloads.
- Applications with dynamic traffic and resource demands.
4.2. When Not to Use Kubernetes
- Small, single-container applications.
- Prototypes or learning projects where simplicity is key.
- Systems with limited budgets or resources.
- Static workloads that do not require frequent updates or scalability.
- Real-time systems requiring ultra-low latency, where Kubernetes abstraction might introduce delays.
By integrating tools like Docker with Kubernetes, you can create scalable and efficient environments tailored to your application’s needs. However, always evaluate the trade-offs to ensure Kubernetes aligns with your project’s scale and complexity.


